A REPEATABLE METHOD
How to use it
- Check the vessel identity, volume units, smallest marked division and any documented tolerance. Inspect for cracks, distortion, cloudy walls and damaged markings. Choose capacity with safe headroom and graduations that can resolve the intended amount; a bucket’s capacity label is not a volume reading.
- Place a clean dedicated vessel upright on a stable level support. Use safely accessible cool water, keep the floor dry and stay away from energised equipment. Start empty, or record the initial water level if measuring an increase. Do not dismantle plumbing or adjust pressure controls to obtain water.
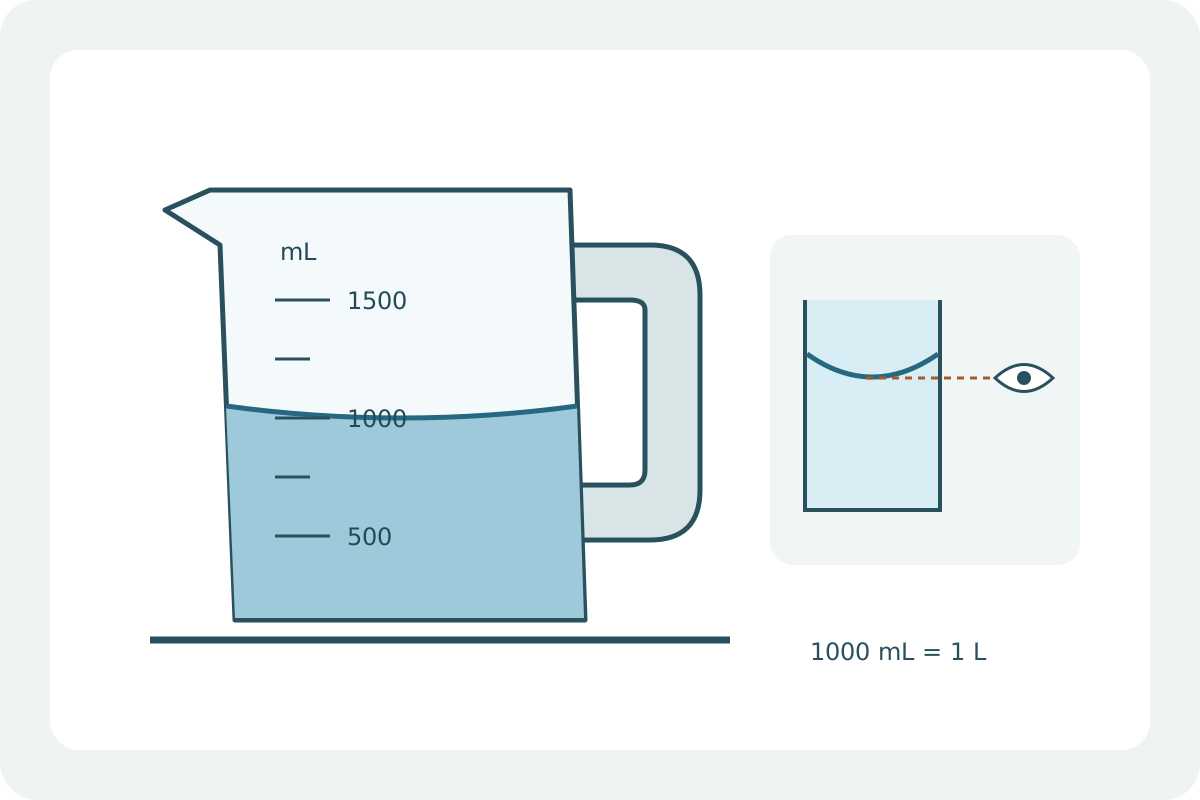
- Allow the surface to settle and read at eye level without tilting the vessel towards you. For a clearly visible concave water meniscus, use its lowest point with the scale convention specified for that vessel. Do not read the top of foam or guess through an opaque wall; if the surface cannot be read, use a suitable different vessel or method.
- For an outlet-flow observation, collect the entire stream during the same timed interval and record actual collected volume, not the jug’s maximum. Reject spills, missed flow and overflow rather than estimate a correction. A small jug is unsuitable if it fills too quickly to time reliably or cannot safely capture the stream; use an appropriate larger graduated vessel.
- For a permitted batch-water dose, follow the exact product instructions and record what reaches the mixing container. Where a vessel is marked In/TC, the marking describes contained volume, not a promise that pouring transfers every last drop. Do not add unrecorded rinse water or round a recipe to the nearest jug mark; choose a more suitable documented measuring method when needed.
INTERPRET THE MEASUREMENT
How to read the result
- Unit example: 1250 mL = 1.250 L. A jug labelled 2 L does not contain 2 L at every fill level. Do not convert litres to kilograms for an unknown liquid or replace a specified mass ratio with a volume ratio.
- Collection example with starting water: 1400 − 200 = 1200 mL = 1.200 L collected in 6 s. The outlet calculator gives 60 × 1.2 / 6 = 12 L/min. This subtracts two readings, so both reading uncertainties matter; the printed decimals do not prove that precision.
- Scale example: a 50 mL division is 5% of a 1000 mL amount, since 50 / 1000 × 100 = 5%. This is the relative size of one division, not an accuracy of ±5% or a certified uncertainty. A 25 mL dose is smaller than that division and needs a more suitable scale, not an invented extra decimal.
- Use the batch calculator to obtain the required water first. For example, a permitted 1.25 kg dry batch at 6 L per 25 kg needs 0.300 L = 300 mL. The calculation does not demonstrate that the available jug can deliver that amount accurately, or authorise splitting a product that prohibits partial batches.
TROUBLESHOOT THE METHOD
Common problems and what to check
The level looks different from above and below.
Return the vessel to a level support and bring your eye to the surface height. Do not average two tilted viewpoints; if the mark or surface remains unclear, record that limitation and use a suitable method.
The required amount falls between coarse marks.
Use a vessel with an appropriate documented scale and tolerance, or a product-approved alternative method. Do not change the recipe, assume half a division is a certified resolution or scale up to an unsafe batch just to suit the jug.
The amount poured differs from the amount first read.
Check for residue, spillage and the vessel’s contain/deliver convention. Do not silently add water to compensate. An initial content reading alone is not evidence of the final delivered dose.
STOP BEFORE THE HAZARD
Safety boundary
- Do not use this household method for hot, pressurised, hazardous or unknown liquids. Material compatibility, cleaning and temperature limits depend on the actual vessel and substance; a plastic code is not universal chemical approval.
- Keep measuring vessels used with construction materials separate from food and drinking-water use. Do not reuse a contaminated jug for kitchen work because its material was originally food-contact suitable.
- Avoid overflow, slippery floors and heavy lifts; support the vessel rather than hold a large full jug at eye level. Keep children away from working materials and label dedicated non-food equipment clearly.
SMART BUYING GUIDE
What to look for when choosing
- Match useful scale and documented tolerance to the required volume; maximum capacity and number of printed digits do not establish accuracy.
- Check stable support, a secure handle, readable markings and a spout that lets you transfer water without uncontrolled drips.
- Check the specific vessel’s permitted environment and cleaning method. Do not transfer a manufacturer’s claim for one model to all graduated kitchen or workshop jugs.
Types of tool
Best for: Manageable ordinary-water quantities with a scale suited to the task and safe pouring headroom.
Best for: Smaller quantities when the task requires better reading capability and the vessel’s stated tolerance is suitable; not automatically interchangeable with a jug.
Common functions
Worth paying more for
- A useful documented scale and legible durable markings.
- Stable support and controlled handling for the actual water quantity.
Usually not worth the extra cost
- Extra capacity that makes a small required dose unreadable.
- Claims of precision based solely on printed divisions or an unverified homemade scale.
Sources & instructions
- Bürkle 7204-3000: separate capacity and scale-division specifications (English; this model only)
- BRAND: eye-level meniscus reading and contain/deliver conventions (English; volumetric-instrument guidance, not a jug calibration certificate)
Original schematic, not a photograph or a full-size calibration template. The drawn scale does not certify any vessel.